
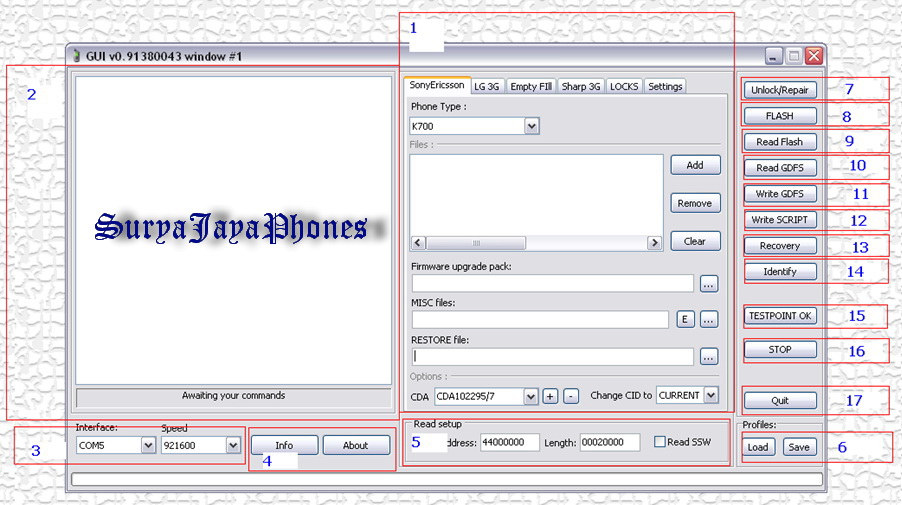
Here is the explaination about every tab on setool2g MAIN SOFTWARE, hopefully could help us to understand what we do.
I. SonyEricsson :


1. Phone Model selection combo box >>> from here we can choose our phone model
2. File Maintaining Buttons :
Add >>> We can add files in SSW format ( .ssw, .cry files ). Also accept BABE format ( fbn, mbn, and bin files )
Remove >>> Removing files in 2.1
Clear >>> Clears all files from all fields
3. Firmware Upgrade pack field >>> Here we can add SFA files, they are used for Firmware Upgrade only !!!
4. Misc file field >>> Here we can place GDFS file in bin format, Customizations packs, Script and custom packages. Near the end of field is placed one button E. When we load SCRIPT file (txt ), pressing this button will allow us to edit our script on the fly!
5. Restore file field >>> Here we can load Restoration files. In current version of SETool we not need to add manually this restoration files, all is made automatic on the fly!
6. CID change option >>> From here we can set needed CID and Color. Will be done after flashing.
7. CDA option >>> Here we can type desire CDA string. Will be written in phone when we make Complete. Plus ( + ) button adds CDA string to storage and we can use it in any time. Minus (- ) button deletes CDA from storage.
2. LG3G tab :

Numbers :
1. Phone Model Selection combo box >>> from here we can choose our phone model
2. File Maintaining Button :
Add >>> We can add files in SSW format. All files are in SSW format extention !
Remove >>> Removing selected file from 2.1
Clear >>> Clears all files from all fields
3. GDFS File >>> Here we can load binary GDFS files for repairing LG3G phones
3. SEMC A2 tab :
With same functionality as SEMC tab to use it to flash, customize, read GDFS and write script to A2 ( DB 3150 ) phones.
1. Empty Fill tab
This tab is use when we have " BLANK phone " which means Phone board with EMPTY FLASH CHIP !!!

1. Phone Model selection combo box >>> From Here we can choose our phone model
2. File Maintaining Button :
Add >>> We can add file in SSW format. All flash files are in SSW file extention !
Remove >>> Removing selected file in 2.1
Clear >>> Clears all files from all fields
3. IMEI >>> Here we can type IMEI number that we want permanently written in OTP area
4. Write IMEI To OTP >>> Check this option if we want to fill that we have typed in IMEI edit to OTP ( One Time Programable ) area on flash chip!
5. SELECT CID >>> From here we can set Desire CID ( certified ) that will be placed in our empty board
4. Sharp 3G tab :

Numbers :
1. Phone Model selection combo box >>> Here we can choose our phone model
2. File Maintanining buttons :
Add >>> We can add file in SSW format. All flash files are in SSW extention
Remove >>> Removing selected file in 2.1
Clear >>> Clears all files from all fields
3. GDFS File >>> Here we can load binary GDFS files for repairing Sharp 3G phones
5. PDA tab :
This tab is used when we want to service SonyEricsson Smart Phones !!!

Numbers :
1. Phone Model selection combo box >>> From here we can choose our phone model
2. File Maintaining Buttons :
Add >>> We can add file in SSW format. All flash files are in SSW extention
Remove >>> Removing selected file in 2.1
Clear >>> Clears all files from all fields
3. Misc file field >>> Here we can place GDFS file in bin format, Customize packs, Script and Custom packages. Near the end of field placed one button E. When we load SCRIPT file ( txt ), pressing this button will allow us to edit our script on the fly.
4. Process PDA update files >>> If checked CDA will change
Example :
W950i with GENERIC firmware flashed with ACPU_NI_TRADE_HONGKONG without the " process PDA update files " tickbox, the software info screen would look something as follow :
PDA software verrsion :
CXC 162088 R1B01 < -- original s/w that came with smartphone
CXC 162101 R1B01 < -- New s/w flashed with SETool
CDA version :
CDA 162014/2 R1B01 < -- this was the original firmware
CDA 162017/48 R1A12 < -- this is the new firmware flashed via SETool
If the box is ticked, then only the last line of each section is show - or, in other words, how a standard set ( withthe respective firmware ) would be.
6. LOCKS tab :
This tab is used when we want to Lock our SonyEricsson phone!!!

Numbers :
1. Phone Model selection combo box >>> From here we can choose our phone model
2. Lock Type >>> Here are the option that we can use to lock our phone
Lock Network >>> Use this option if we want to lock the phone to specific operator. That mean after locking the phone will work with sim card only from operator that we have lock to
3. Lock Setting >>> Here we can choose and specify to what operator we want to lock the phone. We can choose desired COUNTRY and OPERATOR from combo box !!! If our operator not in list We can type operator MCC+MNC in edit box ( xxx-(x)-xx ). We can choose MNC length. If we select " MNC3 " option we can enter three digits MNC code
4. Read Locks/Write Locks Button >>> If we want to check phone lock setting push Read Locks button. Use Write Locks button when we are ready with settings. After operation phone will be locked regarding our setting !!!
7. Setting tab :

7. Setting tab :

Check List options :
[ ] Complete phone >>> this option is needed when we flash FS images into our SE phones, when is chacked, file that are needed for completes operation will written. If we have already putted Original Customizations Package we not need to check it when flashing
Note : If you don't make Complete phone after flashing you will have not working phone with " Configuration Error " message
[ ] Enable Format GDFS >>> When is chacked, this option will format GDFS on phone
Note : This option is executed ONLY when you write GDFS in bin format loaded in MISC files field !!
[ ] Unlock After Flash >>> When sis checked this option will automatically UNLOCK the phone when we flashing it
[ ] Revert Color to Red >>> This option is needed when we working with CID37 and CID36 phones. When is checked at the end of any operation that we perform, will make phones COLOR : RED
[ ] Force LG3G CID17 >>> Check it ONLY IF YOU HAVE LG3G with OTP CID17 and IT CAN'T BE BOOTED !!
[ ] Use TESTPOINT >>> This option allows you to work with TESTPOINT when you service special cases !
[ ] Disable Switch With USB >>> This option disables possibility of using USB interface. Check it if flashing stops after SWITCH to USB attemp !
[ ] Patch OTP > GDFS check in Firmware >>> This option is needed if you want to change IMEI of phone. This check is inside firmware and its functions to compare OTP IMEI and GDFS IMEI in any time. If by some way GDFS IMEI has been changed it report to main code that condition and automatically LOCKS GDFS ON ALL LEVELS ! By patching that check SETool allows us to set desire IMEI in GDFS wthout any problems !!!
[ ] Allow to change IMEI when Unlocking >>> This option is connected to above one. This allows us to set desire IMEI when Unlocking, but note that phone will work after this operation ONLY if you already patched the OTP<>GDFS check inside firmware !!
[ ] Use SERVER FOR CSCA UNLOCK/FLASH >>> This option should be checked when you work with DB 2012/ DB 2020/ PDA with NEW SECURITY
[ ] Do FULL UNLOCK INSTEAD OF USER CODE RESET ON DB 2012/ DB 2020/ PDA with NEW SECURITY/ DB 2001 >>> This option is needed when you want to unlock SP locked phones. If it is not selected, when you press "UNLOCK" button on any new security phone, you will reset USERCODE instead of SP lock !!!
II. LOG STATUS WINDOW :

Here we can watch all needed information strings when we working with SETool
THIS IS THE MOST IMPORTANT CONTORL !!! If we have any problems during flashing and can't find SOLUTION to your problems, save log and show it to Advanced USER on SETool SUPPORT FORUM !!!
III. Interface/ Speed Controls :
See number 3 on the first picture above
From here we can set our desire interface that can be COM port, USB or UFS ! Also we can set desire SPEED !
IV. Information/About buttons
See number 4 on the first picture above
Info >>> Pressing this button will show us information about our Flash/Unlock counters and Server Account if we have one!
About >>> Pressing it will open in your browser SETool home page !
V. Read Setup Controls
See number 5 on the first picture above
From this control we can read any part of flash file system on phone !
We can specify the following :
Address >>> Start address in HEX format, from this address we will begin to read the flash data
Length >>> Specifying the size of readed data in HEX format
Read SSW >>> If its checked our output will be in SSW format, otherwise output file will be row binary file with no information in it about start address
VI. Profiles Controls
- Profiles are every your saved setting for every model
- Profiles saves settings separate for every model in every window
- Profiles now auto- load when model changed
How to use them :
SAVE >>> saves all files and setting for current model
Load >>> Restore save files and settings from current model
MAIN BUTTONS :
7. Unlock/Repair :
All is written on Button, no other words here !
8. Flash :
Pressing this button we will perform the "Flash" operation, that mean we will write flash ( data ) on flash chip on the phone !
9. Read Flash :
With this button we can read the flash area. It use with Read Setup Controls that are explained above in point 5
10. Read GDFS :
Pressing this we will READ ROW Binary GDFS of phone
11. Write GDFS :
With this button we can write row binary GDFS files in phone. Files must be loaded in MISC files field on SonyEricsson Tab (1.4 )
12. Write SCRIPT :
Pressing this button we can execute SCRIPT files, how to is explained in chapter 5
13. Recovery :
This button allow us to Recover Phone Certificates. WE CAN PERFORM IT ON ALL CIDs EXPERT CID:49 !!!
Recovering is DISABLED at phone that have CID:49 Certificate on OTP area, because making it we will KILL our phone. Some models forever some will be repaired ONLY by TEST POINT operations !!!
14. Identify :
This is most valuable button for NEW and ADVANCE users !!
By performing identify on phone we READ all needed informations for servicing like CIDs, IMEI, SW version, color, Lock status etc
15. TESTPOINT OK :
This button is needed when we worke with TESTPOINT and when we service CID:49 phones ! Softwares tells us when we need to press it !!
16. STOP :
Pressing this button will ABORT all OPERATIONS that are currently executed by software ! We need it when SW hangs or tells us to press it !!!
17. QUIT :
Pressin this button will CLOSE current working window of SETool Software !!!
To Be Continued on the next SETool triks...

Arek NGAJUM IsoIso Ae
No comments:
Post a Comment